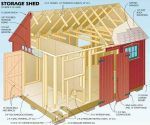
These lean to shed plans for a durable lean-to shed cum tool bin have
- double doors
- plywood siding and cedar trim
- asphalt shingle roofing
- 18 square feet floor space
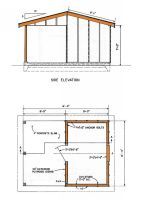
- 8 ft tall rear wall for easily accommodating shelves and long handle tools
This is not commonly available in usual lean to shed crafting diagrams.
Lean To Shed Plans – Step By Step Instructions For Building A Lean-To Shed
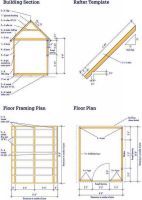
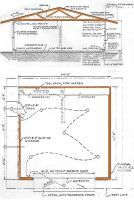
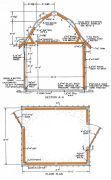
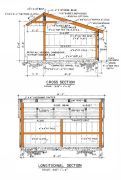
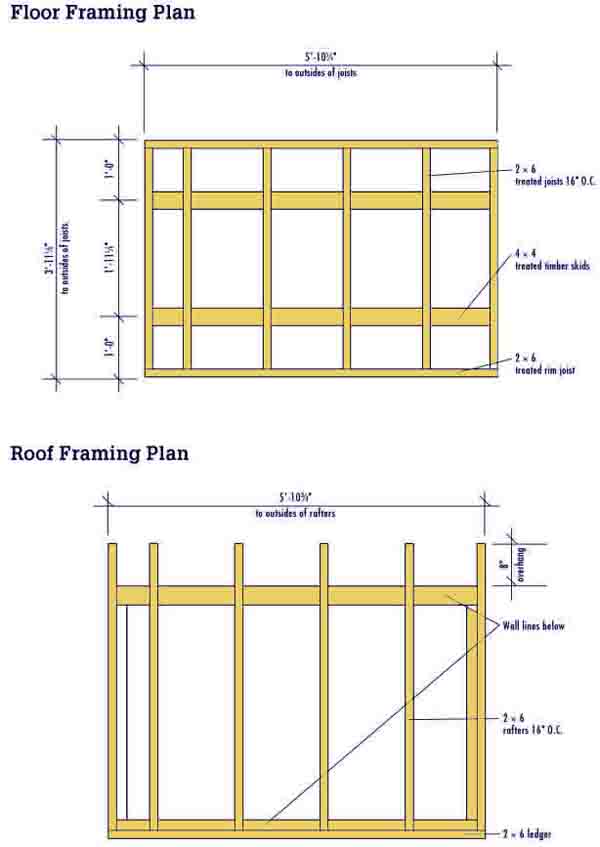
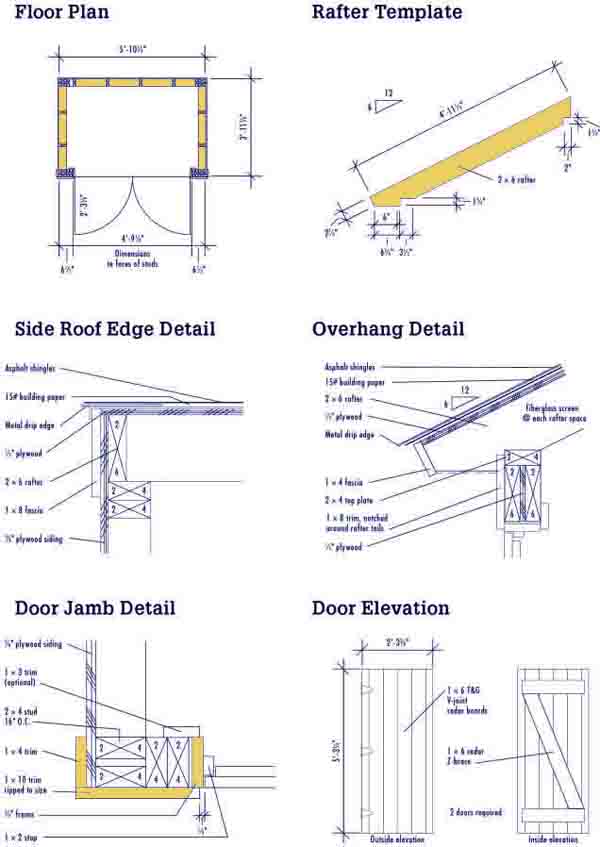
1. Prepare the site with a 4″ layer of compacted gravel. Cut the two 4 x 4 skids at 70 2/4″. Set and level the skids following the shed building plans. Cut two 2 x 6 rim joists at 7 3/4 ” and six joists at 44 3/4″. Assemble the floor and set it on the skids as shown in the floor framing section of the lean to shed plans. Check for square, and then anchor the frame to the skids with four joist clip angles. Sheath the floor frame with 3/4″ plywood.
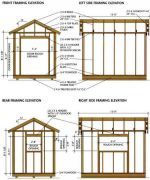
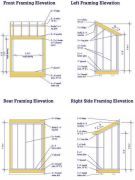
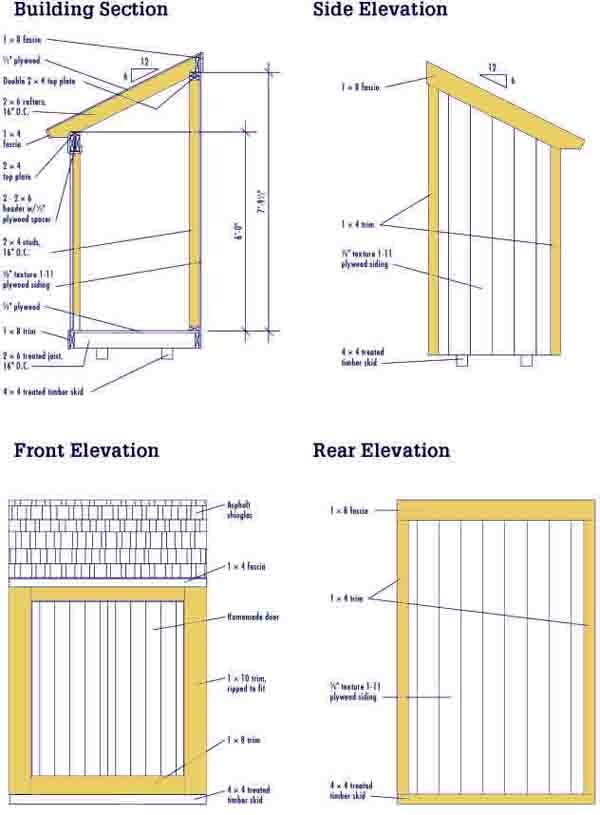
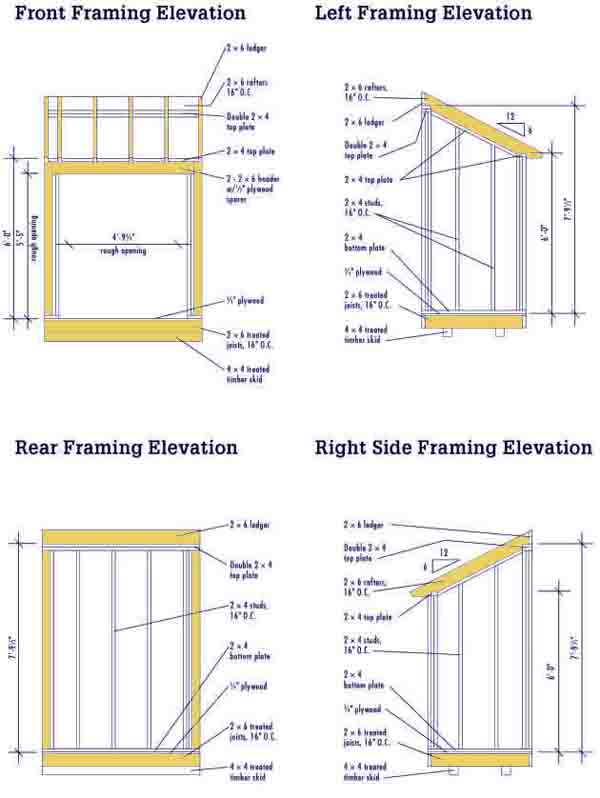
2. Cut plates and studs for the walls: Side walls—two bottom plates at 47 3/4″, four studs at 89″, and four studs at 69″; Front wall-one bottom plate at 63 3/4″, one lop plate at 70 3/4″ and four jacks studs at 63 1/4″ Rear wall—one bottom plate at 63%”. Two top plates at 70 3/4″, and six studs at 89″. Mark the stud layouts onto the plates
3. Fasten the four end studs of each side wall to the bottom plate install these assemblies. Construct the built-up 2×6 door header at 63 3/4″. Frame and install the front and rear walls, leaving the top plates off at this time. Nail together the corner studs, making sure they are plumb; install the rear top plates flush lo the outsides of the side wall studs-install the front top plate in the same fashion.
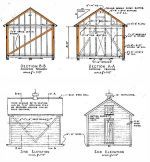
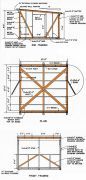
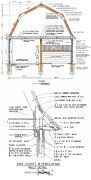
4. Cut the six 2 x 6 rafters following the RAFTER TEMPLATE Cut the 2 – 6 ledger at 70 3/4″ and bevel the top edge at 26.5 degrees so the overall width is 4 5/4″. Mark the rafter layout onto the wall plates and ledger, as shown in the ROOF framing section (loafing shed plans), then install the ledger flush with the back side of the rear wall Install the rafters.
5. Complete the side wall framing: Cut a top plate for each side to fit between the front and rear walls, mitering the ends at 26.5 degrees. Install the plates flush with the outsides of the end rafters Mark die stud layouts onto the side wall bottom plates, and then use a plumb bob to transfer the marks to the top plate. Cut the two studs in each wall to fit, mitering the top ends at 26.5°. Install the studs.
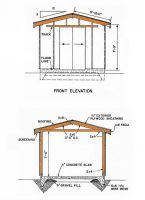
6. Sheath the side walls and rear walls with plywood siding, keeping the bottom edges 1/2″ below the floor frame and the top edges flush with the tops of the rafters overlap the siding at the rear corners, and slop it flush with the face of the front wall.
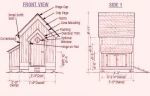
7.Add the 1 x 4 fascia over the bottom rafter ends as shown in the OVERHANG DETAIL. Install 1 x 8 fascias over the top rafter ends Position all fascias 1/2″ above the rafters so it will be flush with the roof deck. Overhang die front and rear fascia to cover the ends of the side fascia, or plan to miter all fascia joints Cut the 1 x 8 side fascia to length, and then clip the bottom front corners to meet the front fascia install the side fascia.
8. Install the 1/2″ roof sheathing, starting with a full-width sheet at the bottom edge of the roof. Fasten metal drip edge along the front edge of the roof. Cover the roof with building paper, then add the drip edge along the sides and top of the roof, shingle the roof, and finish the top edge with cut shingles or a solid starter strip.
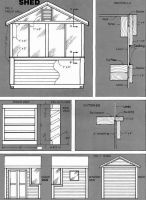
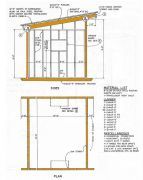
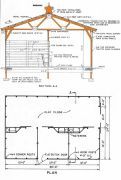
9. Cut and remove the bottom plate inside the door opening. Cut the 1 x 4 head jamb for the door frame at 57 1/2″ and cut the side jambs at 64″ Fasten the head jamb over the sides with 2 1/2″ deck screws Install 1 x 2 doorstops 3/4″ from the front edges of jambs, as shown in the DOOR JAMB DETAIL. Install the frame in the door opening using shims and 10 d casing nails.
10. For each door, cut six 1 x 6 tongue and groove boards at 63 3/4″. Fit them together, then mark and trim the two end boards so the total width is 27 5/8″. Cut the 1 x 6 z-brace boards following the DOOR ELEVATION. The ends of the horizontal braces should be 1″ from the door edges. Attach the braces with construction adhesive and 1 1/4″ screws install each door with three hinges.
11. Staple fiberglass insect screen along the underside of the roof, securing it to each rafter. Cut and install the 1 x 8 trim above the door, overlapping the side door iambs about 1/4″ on each side.
12. Rip vertical and horizontal trim boards to width. Notch the ripped 1 x 8 to fit around the rafters as shown in the DOOR OVERHANG DETAIL. Notch the top ends of the ripped 1 x 10s to fit between the rafters and install them. Add the notched 1 x 8 trim horizontally below the door, between the 1 x 10s. Install the 1 x 4 comer trim, overlapping the pieces at the rear corners